|
A sweet and spiced treat for spooky October nights 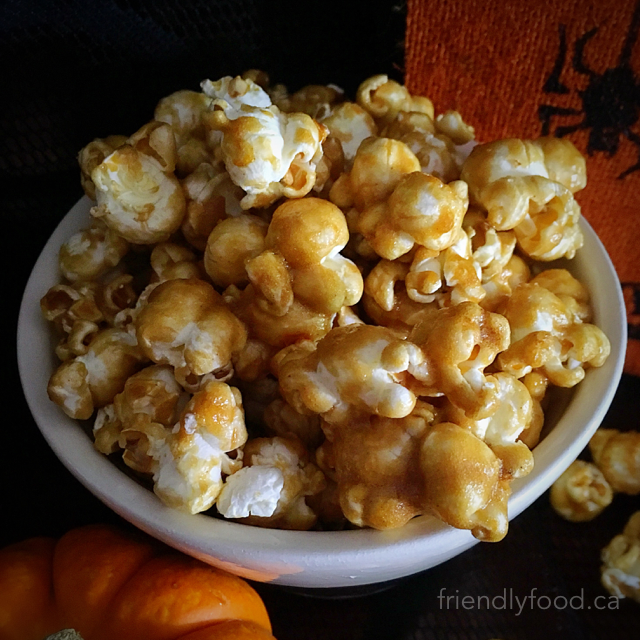 Prep & Baking Time: 45 Makes: 10-12 cups Main Ingredients: 10-12 cups popped popcorn, lightly salted 1 cup brown sugar or coconut sugar ½ cup plant-based butter ¼ cup agave nectar or corn syrup ½ tsp baking soda 1 tbsp vanilla ½ tsp ground cinnamon ¼ tsp ground ginger Pinch of ground nutmeg and ground clove *use as much or as little of these spices as you like, develop your own combination that suites your taste! * alternatively use 1 – 1 ½ tsp of pre-mixed pumpkin pie spice Method: Preheat oven to 250°F. Line two baking sheets with parchment paper. In a 4 cup or larger microwave safe glass container, preferably with a handle, combine sugar, syrup, and butter. Microwave the mixture for 30 seconds, remove and stir to blend the melted butter with the sugar-spice mixture. Return the mixture to the microwave and heat the mixture for an additional 2 minutes; be sure to watch the mixture to avoid any boil over. Remove, and again, stir to make sure all the sugar is heating evenly and that there are no lumps. Return the mixture to the microwave for one last heating of 1 minute and 30 seconds. Be sure to have your baking soda and vanilla ready to add as soon as the bubbling mixture is removed from the microwave. *The sugar mixture will be very hot, this is not something to do while distracted and should not be attempted by children. Add the vanilla and the baking soda and stir vigorously to combine. The mixture will lighten in colour and become frothy. Be sure that all of the baking soda is mixed through and pour the hot golden mix over the waiting popcorn. Using a large spoon or rubber spatula, fold the spiced sugar syrup into the popcorn. You want to be gentle so that you don’t crush the popcorn, but be sure to work quickly while the mixture is still warm. Spread the coated popcorn out onto the two lined baking sheets as evenly as possible. Bake for 30 minutes total removing the sheets to stir the popcorn every 10 minutes. Allow the caramel corn to cool for 15-20 minutes before serving or storing in air tight containers for up to one month. This popcorn is so tasty and likely won’t last long, but if you are able to tuck some away be sure that the container has a tight seal. Even then you may need to give it a shake after storage to help break up any stuck pieces.
0 Comments
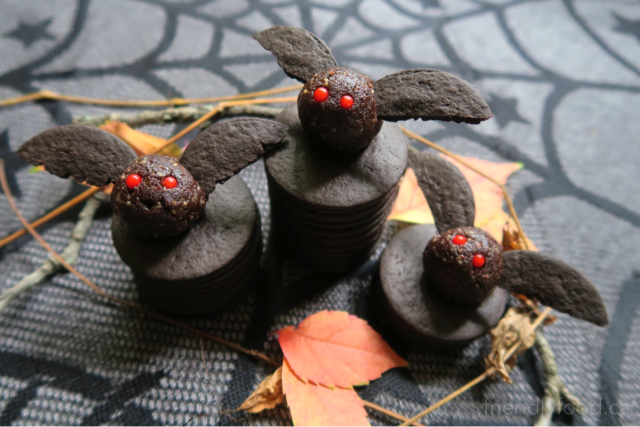 Get them while you can...they only come out at night! Prep & Cooking: 20 minutes Makes: 6-8 bats Main Ingredients: 1/3 cup nuts – pecans or walnuts work best, or use a combination of both 4-5 medjool dates, pitted and chopped 1 tsp vanilla extract pinch of salt 1 tbsp cocoa powder Small red candies, such as; pieces of jellybean or chopped cranberries to be used for bat eyes 10 chocolate cookies – cutting them can be tricky so having a few extras is a good idea *you can use plain chocolate wafer cookies or remove the cream from chocolate sandwich cookies. Sandwich cookies will likely be your best bet if you need or want a gluten free bat-wing option. Method: In a food processor, chop nuts until fine (see photo). Add dates, vanilla, and salt. Continue processing until all ingredients are incorporated. Add cocoa powder and continue processing until completely blended. Unplug your food processor and remove the mixture. The mixture should hold together easily when pinched, if not, continue processing for approximately 1-2 minutes; if mixture is still too try add an additional pitted chopped date and process. Roll into 1” balls and refrigerate for a few minutes while creating the chocolate cookie wings. Break cookies in half by hand or using a knife. You may wish to use the point of a knife to create rough edges on the wings. Using a toothpick, create two small holes in the chocolate ball to place the red candy or cranberry eyes. After the eyes are in place, again, using a toothpick, create two small slits in either side of the chocolate ball to hold the wings. This works best if the chocolate balls are chilled in the refrigerator for a few minutes beforehand. These bites make a cute addition to your Halloween snack tray or a spooky addition to a packed lunch. If you are making them ahead, store the chocolate balls in the refrigerator and add the eyes and wings before serving. If you are travelling with them be sure to store them in a hard-sided container to avoid squishing. Nightmarish nibbles to please even your most ghoulish guests! 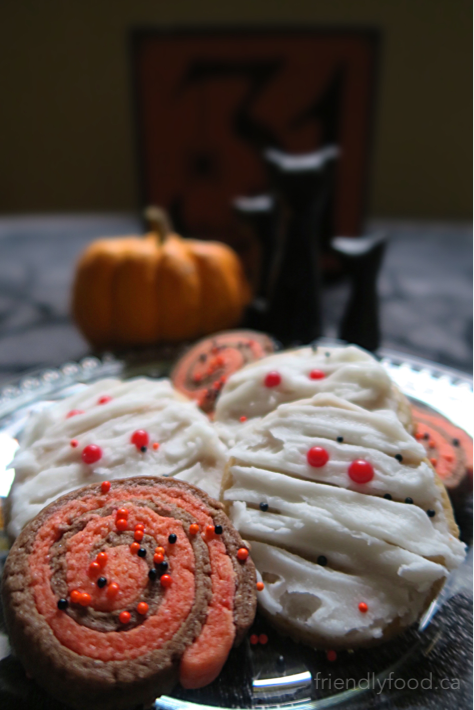 Prep & Cooking: 1 hour (plus cooling and frosting time) Makes: 18-24 cookies depending on thickness Cookies Main Ingredients: 1 cup all purpose flour, or gluten free blend 1/3 cup sugar 1 tbsp maple syrup or agave nectar (optional) 1 tsp baking powder 2 tsp pumpkin pie spice (optional) 1/3 cup plant-based butter 2 tsp vanilla extract 1 tbsp plant-based milk Pinch of salt Yummy Mummies Cookie additions: Small red candies, such as; pieces of jellybean or chopped cranberries to be used for Mummy eyes Frosting – see recipes below Spooky Spiral Cookie additions: 1 tbsp cocoa powder A few drops of orange or combine red and yellow food colouring Halloween coloured sprinkles (optional) Method: Preheat oven to 350°F and line two baking sheets with parchment paper. In a large mixing bowl, combine dry ingredients. In a separate bowl, cream together butter, sugar, and vanilla. Add the dry ingredients to the sugar mixture and stir together until all ingredients are incorporated and there are no lumps. Separate the dough in half and one half again. You should have three pieces of dough, one larger than the other two. The two smaller pieces of dough will be tinted with cocoa powder and food colouring for a Halloween effect. Add the cocoa to one piece of dough and work through with a spoon or clean hands until a uniform dark brown colour is achieved. Do the same with the second small piece of dough and the food colouring to create an orange colour. The dough should be firm and easy to roll into three balls. Refrigerate the dough balls for 10-20 minutes while you make the frosting. (Cookie Method continued below) Frosting Main Ingredients: 1 cup powdered sugar 1 tbsp plant-based milk ½ tsp vanilla Method: In a bowl, blend together all ingredients until no lumps remain; using a fork can help to break up any lumps of powdered sugar. The frosting should be thick and spreadable. If it is too runny, add more sugar 1 tbsp at a time. These cookies are best frosted no more than a day before you plan to eat them. They can be stacked in a container after the icing has firmed up, but to be safe, place parchment or waxed paper in between layers of cookies. Cookie Method Continued: Remove the plain dough from the refrigerator and roll out on a floured surface to around a ¼ of an inch. Using a 2 inch cutter, a mason jar, or any other round cutter, cut around 10-12 circular cookies. Transfer to the prepared baking sheets and bake for 8-10 minutes. While the Yummy Mummies are baking get started on the Spooky Spirals. Roll each of the coloured dough balls out into a rectangle approximately ¼ inch thick. The rectangles should be about 4”x 8”. Place one rectangle on top of the other (see photos) and roll together tightly on the short side. When the spiral roll is complete, cut the dough log into ¼ inch slices using a sharp knife. This will create around 8-10 cookies. Top the cookies with coloured sugar or sprinkles if you choose and transfer the spiral cookies to the prepared cookie sheet to bake for 10-12 minutes. Transfer warm cookies to a cooling rack and allow to cool for about 10 minutes. When cookies are cooled completely frost the Yummy Mummies with the frosting recipe found above, or if you would prefer to use something you have purchased – go for it! Frost the cookies by evenly coating the cookies one at a time with a thin layer and allow frosting to set as you complete them one at a time. Beginning with the first frosted cookie, add additional icing, thicker this time, using a knife and spreading the frosting from side to side; the messier the better to create a bandaged effect. Place the red candies or cranberries on as eyes and give the cookies a few minutes to set. Tips & Variations:
|

Archives
December 2020
Categories
All
|