|
A tasty top-off to your holiday meal! 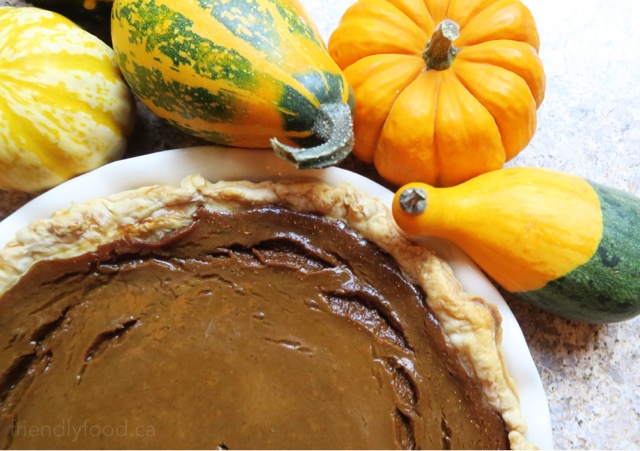 Prep & Cooking: 1 hour 30 minutes + 30-60 minutes chilling time Makes: 1 deep dish or 2 standard 9” pies Pairs well with: Coconut Whipped Topping & Fall Menu Plan Pie Shell: If you can find and want to use a pre-made plant-based pie shell, go for it! Otherwise, find the ingredients below to make your own; 1 cup flour – I use all purpose, but use what you have or substitute a gluten free blend if needed ½ cup cold plant-based butter, shortening or very cold coconut oil ¼ cup of ice water Filling: 1 can (15 oz) pureed pumpkin or 2 cups cooked, pureed pumpkin ½ cup maple syrup or ½ cup sugar 1 (10-12/300-400g) package of silken tofu, drained 2 tbsp corn starch 1 tsp vanilla Spices: 1 tsp ground all spice ½ tsp ground ginger ½ tsp ground nutmeg 1 tsp ground cinnamon ¼ tsp ground cloves OR 2 tbsp of pre-blended pumpkin pie spice ¼ tsp salt Method: Preheat oven to 450°F. If you are creating your own pastry shell, follow the instructions below; In a large mixing bowl, combine flour and plant-based butter. Using a pastry cutter or 2 knives, or forks slice through the butter incorporating or “cutting” it into the flour. When the mixture is well blended and no large lumps remain, slowly add the water, a tablespoon or 2 at a time, and continue mixing until a dough forms and the mixture is no longer crumbly. Form the dough into a ball and wrap in a clean tea towel and refrigerate while you make your filling (see below). When you are ready, roll the dough out using a rolling pin on a floured surface. I suggest “blind baking” your pie shell, whether homemade or not, prior to pouring in the filling. This means pre-baking the crust for a short amount of time. I do this by pricking several holes in the bottom of the crust with a fork and baking for 10-12 minutes without any filling. You can also cover the pie shell in parchment paper and fill the cavity with pie weights or dry beans before blind baking to help the shell keep its shape; however this is not completely necessary. In a large mixing bowl, blend together all of the filling and spice ingredients listed above. Use an electric mixer, hand blender, or whisk to break up any tofu chunks. When all the ingredients are blended, and your mixture is smooth, pour the filling into the pie shell, and bake for 15 minutes. If you are using a premade pie shell choose a deep dish version. If you can’t find one or you have a small pie plate, you may be able to get two standard 9” pies from this filling. If you have extra filling left over, and only one pie shell or plate, you can also bake this filling in a baking dish sans shell or small individual oven safe cups; it just ends up more like a baked pumpkin custard. After 15 minutes, reduce the heat to 350°F and continue baking for an additional 45-60 minutes. Remove from the oven and test for doneness using a knife in the centre of the pie. When it comes out clean, it is baked through. Allow to cool for a minimum of 30 minutes before allowing to chill in the refrigerator for an additional minimum, 30 minutes. Serve on its own, or top with Coconut Whipped Topping. Tips & Variations:
0 Comments
A nut-free, on-the-go snack to keep you satisfied! Lunch-box safe too!  Prep: 10 minutes Makes: around 10 bites Main Ingredients: 1 cup rolled oats (not quick oats) ¼ cup sunflower butter 3 tbsp maple syrup 2 tbsp shelled sunflower seeds 2 tbsp chocolate chips (optional) ¼ tsp salt (optional) Method: In a medium bowl, combine all ingredients and stir to combine. Form mixture into 1 inch balls and place in an airtight container. Store bites in the refrigerator for up to 2 weeks and enjoy! Tips & Variations:
Tart plum filling surrounded by a sweet oatmeal base and nutty crumb topping 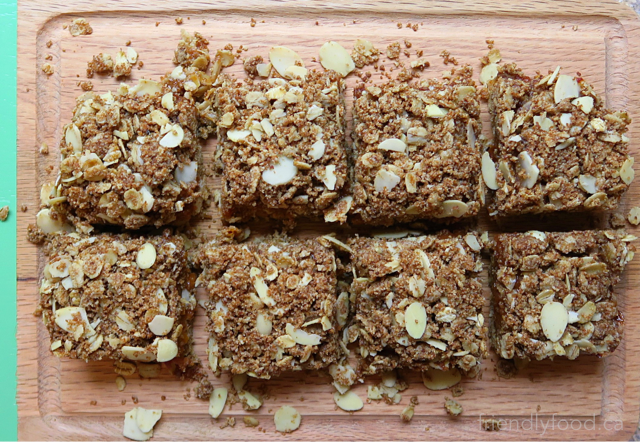 Prep & Baking: 40-50 minutes Makes: 8 bars Main Ingredients: Base: ¾ cup oat flour ½ cup gluten free rolled oats ¼ cup liquid coconut or vegetable oil ¼ cup coconut sugar ¼ tsp ground ginger ½ tsp cinnamon ¼ tsp salt Filling: 2 cups of chopped plums, skin on (approximately 10-15 small red plums) ¼ cup coconut sugar ¼ cup water ½ tsp cornstarch mixed with 1 tbsp warm water Topping: ¼ cup coconut sugar 1/8 cup liquid coconut or vegetable oil ¼ cup gluten free rolled oats ½ cup oat flour ¼ cup chopped or flaked almonds ¼ tsp salt ½ tsp ground ginger ½ tsp cinnamon Method: Preheat oven to 350°F and line a loaf pan with parchment paper. Combine all filling ingredients, except cornstarch blend, in a medium saucepan. Over medium-high heat, bring fruit, sugar, and water to a boil. Reduce heat to medium and allow mixture to simmer uncovered. Keeping the saucepan uncovered will allow for the liquid to evaporate and create a thick plum filling. Allow fruit mixture to continue simmering for 20-25 minutes; stirring frequently to avoid burning. When finished, the plum mixture should be thick enough to spread. Remove from heat and allow to cool for 5-10 minutes then transfer to baked base. While the fruit is cooking, create the base of the slice. In a medium bowl, combine all ingredients for the base and stir to combine. When all ingredients are incorporated and no lumps remain, transfer the base mixture to the parchment lined loaf pan. Press the base ingredients firmly and evenly into the bottom of your loaf pan. Bake the base for 10 minutes. Allow the base to cool for 5-10 minutes before starting to layer the ingredients. While the fruit and base layer are cooling, create the topping. In a small to medium sized mixing bowl, combine all topping ingredients and mix together with a fork. The mixture should be loose and easy to sprinkle. Assemble the slice for the final bake by layering the plum filling over the pre-baked base; spreading with the back of a spoon to reach the edges and create an even layer. Sprinkle the plum layer with the topping mixture; building an even layer. Press the topping layer gently into the plum layer. If you are using a glass loaf plan you will be able to see 3 distinct layers. Bake at 350°F for an additional 20 minutes. Allow to cool and if needed, run a knife along the edges of the slice. Lift the slice out of the pan using the parchment paper and cut into 8 or fewer pieces. These pieces store well in an airtight container for up to 1 week in the refrigerator. Tips & Variations:
A Summer to Fall transitional treat! 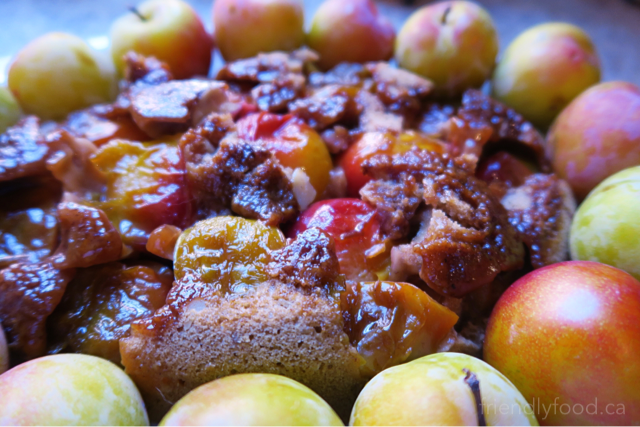 Prep & Cooking: 40 minutes (plus cooling time) Serves: 8-9 Pairs well with: Coconut Whipped Topping Main Ingredients: 8-12 small red plums halved and pitted 1 cup whole wheat flour or gluten free blend ¼ cup + 2-3 tbsp coconut sugar or light brown sugar of your choice ¼ cup + 1 tbsp melted coconut oil or other light oil of your choice ½ cup almond or other plant milk 2 tsp white vinegar 1 tsp baking powder ¼ cup chopped, slivered or flaked almonds 1 tsp vanilla 2 tsp cinnamon 1 tsp ground ginger Method: Preheat oven to 350°F and in a 9x9 (or equivalent, you’ll notice I used an oval dish) melt 1 tbsp of coconut oil and sprinkle the bottom with a few tablespoons of sugar. Halve plums and remove pits. Depending on the style of baking dish or pan you are using, you may find that you want to quarter the fruit. Place cut fruit peel side down on top of the sugared base of the baking dish. In a medium to large mixing bowl, combine sugar, oil, vanilla, milk and vinegar. Stir to combine. In a separate bowl, combine flour, baking powder and spices. Add dry ingredients to wet and stir to combine. If you find the batter is too dry or lumps are not stirring out, add a little bit of water or plant milk; 1 tablespoon at a time. Add almonds to the batter and fold to incorporate. Spread the cake batter over the cut fruit. Do this gently so that you don’t flip or move the fruit. If it doesn’t look perfect, don’t worry – this is a rustic dessert and after baking, the bottom is the top. Bake for 25-30 minutes until a toothpick comes out of the centre of the cake clean. Allow cake to cool for 15-20 minutes before running a kitchen knife along the edges of the cake and turning it out onto a serving plate. The best method for this is to place the plate you will be serving on over the baking dish and turning both the plate and the baking dish at the same time. If you aren’t wanting to flip the cake, no problem, just spoon it onto plates, serve and enjoy – it all tastes the same no matter how you serve it. If you want a little added sweetness, our Coconut Whipped Topping is a tasty addition! Chocolate & vegetables together...the future is now! 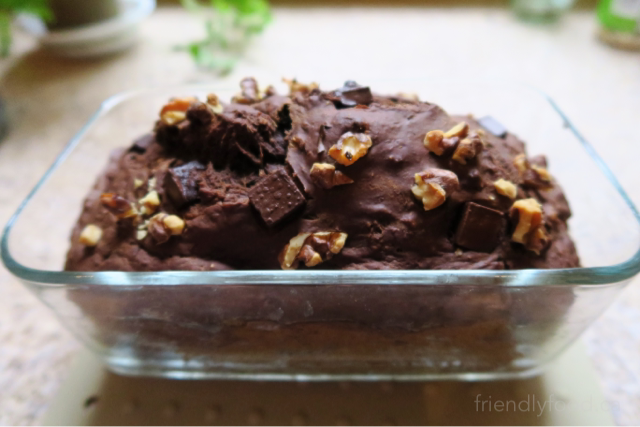 Prep & Baking: 15 minutes prep, 50 – 60 mins to bake Serves: 10 -12 slices or 12 muffins (20-25 mins to bake) Main Ingredients: 1 ½ cups whole wheat flour, or gluten free option if you prefer 1/3 cup cocoa powder 1 tsp cinnamon 1 tsp baking soda 1 tsp baking powder ½ tsp salt 3 medium ripe bananas – I freeze my bananas and quickly microwave them before use, see our Peach Crumble-Top Muffin recipe for tips on using frozen bananas in baking 1 ½ cups shredded zucchini – you can use a box grater for this or a food processor ¼ cup vegetable or melted coconut oil ¼ cup coconut sugar 2 tsp vanilla 1/3-1/2 cup chocolate chips, pieces or chunks ¼ - 1/3 cup chopped walnuts (optional) Method: Pre-heat oven to 350°F and prepare your loaf pan by ‘greasing’ it with plant-based butter or coconut oil if needed. If you are choosing to make this recipe into muffins, prepare your pan or get your paper liners in position. In a large bowl, combine oil, sugar, vanilla, bananas, and shredded zucchini. Stir to combine and use the back of your mixing spoon to break up the bananas until the mixture is smooth with few to no lumps. If your bananas are still firm you may wish to use a fork or a whisk to mash them. In a separate bowl, combine flour, cinnamon, baking soda, baking powder, and salt. After the dry ingredients are mixed, add them to the wet ingredients and stir to combine. The consistency of the batter will depend on the moisture content of your bananas and zucchini. If the batter seems a little dry, add a few tablespoons of water at a time and stir to combine. Add chocolate chips and walnuts to the batter and gently fold until incorporated. Fill your loaf pan and pat the batter down with a spoon or rubber spatula to pop any air bubbles. If you are opting for muffins, fill each of your prepared muffin cups around ¾ of the way full. Whether you are making a loaf or muffins, you can sprinkle with chopped walnuts and chocolate chips for a finishing touch. Bake at 350°F for 50-60 minutes for a loaf, or 20-25 minutes for muffins. Use a toothpick or knife to test the centre of the loaf or muffins, when it comes out clean they are done. Allow to cool for around 10-15 minutes before removing from the pan. Tips & Variations:
Bright tropical flavours rolled together into the perfect bite-sized snack! 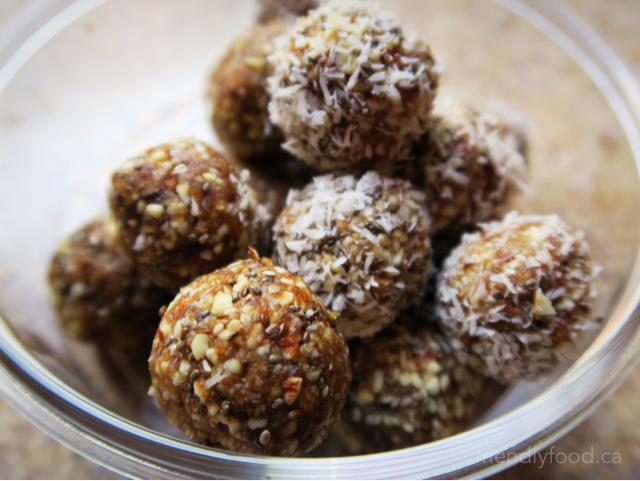 Prep Time: 20 minutes (if using fresh dates) Makes: Approximately 15 pieces Main Ingredients: ¾ cup raw almonds 6-8 Medjool dates, pitted and quartered (see photo below) – I use medjool because they tend to stay fresh and are easily blended as are most fresh dates, if fresh dates aren’t available or you have dried dates on hand, soak them for about 30 minutes in hot water before continuing with the recipe 2 tbsp unsweetened shredded coconut – I prefer unsweetened, but use what you have if it’s sweetened, flaked etc. 1 tsp vanilla 1 tbsp chia seeds (optional) 1 ½ tbsp orange zest OR 2 tsp orange oil or extract – this can usually be found in the baking section of your grocery or health food store near the vanilla Toppings: 2 tbsp unsweetened shredded coconut 2 tbsp finely chopped almonds – do this by hand or add an additional 10 or so almonds to the initial ¾ cup and measure out 2 tbsp before adding the dates to the processor Method: In a food processor, chop almonds until fine (see photo below). Add dates, coconut, vanilla and orange zest or extract. Continue processing until all ingredients are incorporated, often the ingredients will come together and form a ball in the processor. Unplug your food processor and remove the mixture. The mixture should hold together easily when pinched, if not, continue processing for approximately 1 minute. If the mixture is still too dry, add an additional pitted chopped date or two, one at a time, and process. Roll into 1” balls, leave plain or roll in chopped almonds or coconut. These bites make a great on-the-go snack or a great addition to a packed lunch. They keep for around a week in an airtight container in the fridge. If you are travelling with these, be sure to store them in a hard-sided container to avoid squishing. Tips & Variations:
A classic compliment to a cup of tea, or on its own as a snack - mix and match with jam or a sweet glaze 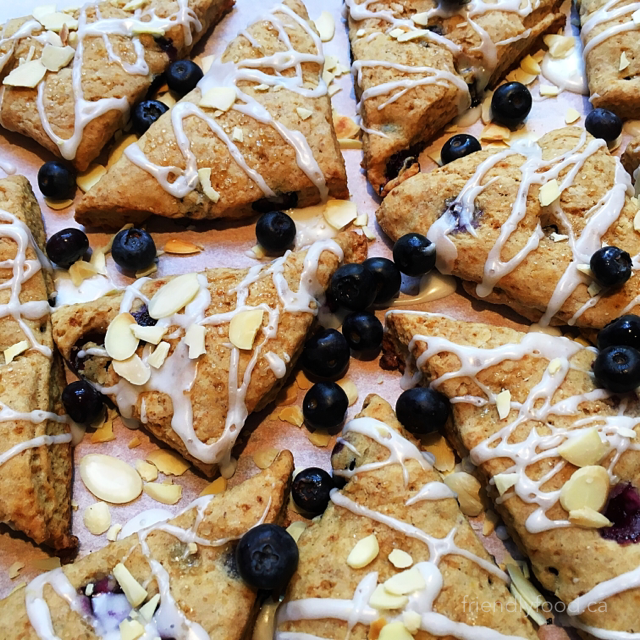 Prep & Baking Time: 35 mins Makes: 16 mini or 8-10 large scones Pairs well with: Chia Seed Jam Main Ingredients: 1 cup whole wheat flour 1 cup all purpose flour – or gluten free blend of your choice totaling 2 cups ½ cup coconut sugar – or a granulated sweetener of your choice 2 tsp baking powder ½ tsp salt 1 tsp cinnamon ½ cup chilled plant-based butter 2/3 cups of unsweetened plant milk – almond, coconut, or soy all work well, but use what you have 2/3 cup berries – use any combination of berries or small cut fruit that you like Zest of one lemon Optional Topping: 2 tbsp melted plant-based butter OR melted coconut oil 1 tbsp coarse sugar ¼ cup chopped nuts Sweet glaze - see tips & variations below for instructions Method: Preheat oven to 400°F and cut a piece of wax or parchment paper large enough to contain a 10”x10” square of dough. In addition, line two baking sheets with parchment paper. In a large mixing bowl whisk together; flour, sugar, baking powder, salt and cinnamon. Add vegan butter to the dry mixture and slice through with a pastry cutter to incorporate. If you do not have a pastry cutter, use two butter knives to slice through and mix the butter into the dry ingredients, it may seem like it will never happen, but it will come together! Be patient, you will need to “cut” the butter into the flour mix in order to gain the consistency of wet sand, after the butter is worked in (no more lumps) the mixture should just barely hold together when pinched. Add milk and lemon zest, stirring to combine. The mixture should come together and be tacky to the touch, if it seems too dry and crumbly, add additional milk, 1 tbsp at a time. Add fruit and gently fold the dough to incorporate it. Form the dough into a ball shape, removing any extra dough from the sides of the bowl with a scraper. Dust your parchment with flour and transfer the dough ball onto the paper. Pat the dough out into a flat square shape, approximately 10”x10”. Using a large sharp knife, cut the dough square into quarters, cut each quarter into 4 triangles by creating an “X” in each quadrants (see photos below for cutting options). This will create 16 mini scones. Using a flipper or spatula transfer each scone to a parchment lined baking sheet. Brush with melted vegan butter and sprinkle with coarse sugar. Bake at 400°F for 15-20 minutes until edges are golden and crisp. Remove from baking sheets and allow scones to cool for at least 10 minutes before enjoying. Use the glaze recipe below for added sweetness and sprinkle with chopped nuts if desired. These scones can be stored in an airtight container for up to a week, be sure to cool completely before storing. Tips & Variations:
A Summertime fruit-filled breakfast, or on-the-go snack! 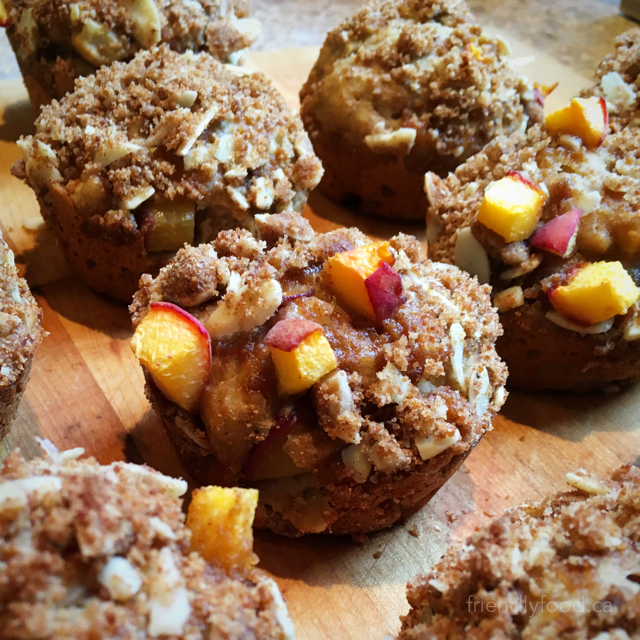 Prep & Baking: 30-35 minutes Makes: 12 muffins Main Ingredients: Muffin Batter: 1 cup whole wheat flour ½ cup all purpose flour – use just one type of flour or a gluten free option if you prefer 2 tsp cinnamon 1 tsp baking soda 1 tsp baking powder ½ tsp salt 3 medium ripe bananas – I freeze my bananas and quickly microwave them before use, see below for more tips ¼ cup vegetable oil ¼ cup coconut sugar 1 ¼ cup diced peaches ¼ cup flaked almonds Crumble Topping: ¼ cup all purpose flour – or flour of your choice 1/3 cup coconut sugar 2 tbsp melted plant-based butter ¼ cup flaked almonds 1 tsp powdered ginger (optional) Method: Pre-heat oven to 400°F and prepare a muffin tin. If your muffin tin requires “greasing”, with plant-based butter or coconut oil, now is the time. If you opt for paper liners they can be placed in now so that they are ready to go. Banana Tip: I use frozen bananas. Freezing ripe bananas is a great way to avoid waste and to have a stash of fruit ready for baking. I remove the banana stem prior to thawing, this creates a nice little opening for the ripe and often very soft fruit to travel through. I then place the bananas, peel on, flat on a plate and microwave them for 1-2 minutes, usually checking every 30 seconds after the first minute. By removing the stem prior to thawing, you will also avoid any bits of burnt banana peel (not a pleasant smell). When the bananas are thawed they can be easily squeezed from their peel right into your mixing bowl. If you have high-powered microwave you may wish to use a low or medium power setting or use the defrost feature instead, this may add a few minutes. In a large bowl combine oil, sugar, and bananas. Stir to combine and use the back of your mixing spoon to break up the bananas until the mixture is smooth with few to no lumps. If your bananas are still firm you may wish to use a fork or a whisk to mash them. In a separate bowl, combine flour, cinnamon, baking soda, baking powder, and salt. After the dry ingredients are mixed, add them to the wet ingredients and stir to combine. Add flaked almonds and diced peaches to the batter and gently fold the batter until incorporated. In an additional small bowl, add all of the crumble topping ingredients and stir until combined. Some of the flaked almonds will break and that’s ok. Fill each of your prepared muffin cups around ¾ of the way full and top with the crumble mixture and bake for 20-25 minutes. Tips & Variations:
A little planning ahead goes a long way in making a batch of this delightful dessert topping! 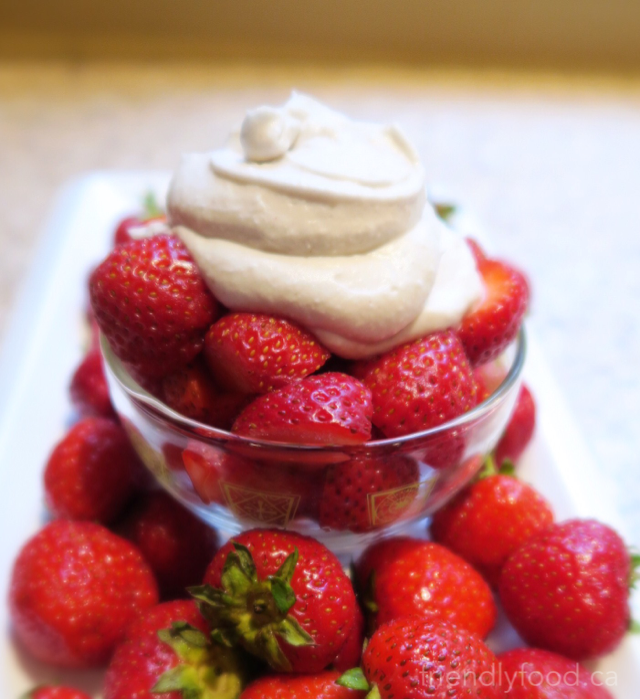 Prep: 5 minutes + overnight chill time for a can of coconut milk Makes: 1 ½ cups Pairs well with: Apple & Summer Berry Crumble Main Ingredients: 1-400ml (14 oz.) can of full-fat coconut milk 1-1.5 tbsp maple syrup or agave nectar – start with 1 tbsp and add more if you would like a sweeter whipped topping 1tsp vanilla extract Pinch of cinnamon Method: Place a can of full-fat coconut milk in your refrigerator overnight or longer, upside down. The fat of the coconut, or coconut cream, will separate from the coconut water as the can chills. The cream is significantly heavier and as a result will settle at the bottom. By turning the can upside down the cream with be at the top of the can when you turn it right-side-up to open it. After the can of coconut milk has been thoroughly chilled (overnight or longer), remove the lid and, using a spoon, remove only the coconut cream. Leave the cloudy coconut water behind, and transfer the spoonfuls of coconut cream to a medium sized mixing bowl. Using an electric beater on medium-high, whip the coconut cream, maple syrup, vanilla, and cinnamon together for approximately 1-2 minutes. Your whipped topping may not be a bright white like commercial whipped topping as you’ve added maple syrup, possibly caramel coloured vanilla, and cinnamon. The mixture should be firm enough to spoon over fruit or other desserts and not runny. If you won’t be enjoying this topping right away, be sure to refrigerate it as it is temperature sensitive and will become runny quickly. This can be stored in a sealed container in the refrigerator, but should be used the same day or as soon after being made as possible. Tips & Variations:
A classic heart-warming dessert sure to please just about everyone! 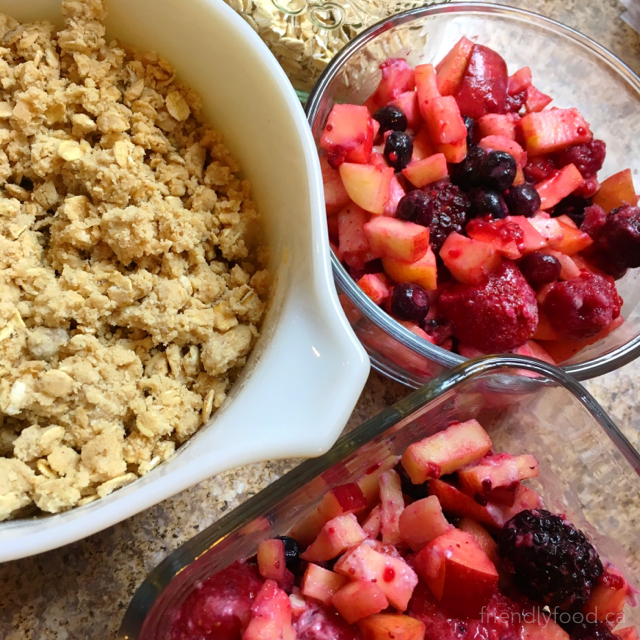 Prep & Cooking: 45-60 mins. Serves: 6-8 Pairs well with: Coconut Whipped Topping Main Ingredients: 3 medium sized apples – I don’t peel my apples, but if you prefer, you can 2 ½ cups fresh or frozen berries of your choice – I used a mix of strawberries, blueberries & blackberries 1 ½ tbsp flour – use what you have; gluten free blend, whole wheat or all purpose Crumb Topping: 1/4 - 1/2 cup brown sugar or coconut sugar ½ cup plant-based butter ¾ cup flour of your choice ¾ cup rolled oats 1/3 cup walnuts chopped (optional) Seasonings/Spices: 2 tsp cinnamon 1 tsp salt Method: Preheat oven to 400°F. In a large mixing bowl, cream together sugar and butter. Add salt, cinnamon, flour, oats and chopped nuts, stir to combine. You may find it easier to work the ingredients together by hand or with a fork to ensure that the oats are evenly distributed. Set this mixture aside while you prepare the fruit. If you are using frozen fruit, allow it to sit out for 10-15 minutes or thaw it in the microwave for 30-45 seconds, this will help to release some of the fruit’s juices which will help with combining flour with the fruit. If you are using fresh berries you may wish to mash a few pieces with the back of a fork in order to create some juice. In a large bowl combine apples, berries and 1 ½ tbsp flour, stir until all of the fruit has been coated. This will thicken any fruit juice and will create a less liquid finished product. Transfer fruit mixture to a 9x9 baking dish. If you do not have a 9x9 baking dish use an oven safe container that will hold the fruit, creating approximately a 1 ½ - 2 inch layer of fruit. You can also use multiple smaller containers, baking times will vary, but not enough to worry about. As you can see in the photos for this recipe I used a loaf sized pan and a small circular dish. Layer the crumb topping evenly over the fruit mixture and place on the middle rack of a preheated oven. Bake uncovered for 20-25 minutes. When finished the topping should be golden and the fruit mixture will be bubbling. Allow the crumble to cool for 15 minutes or more before serving. Tips & Variations:
|

Archives
December 2020
Categories
All
|